Sunday, August 26, 2012

E-Wing Mk II, Finished

Finally got this one wrapped up, and just in time too as my wife is about to go into labor with our second kid any day now. I'm really happy with the way this one turned out.

Up first, the last of the work in progress pics. Here is Corran and his droid Whistler in the cockpit before I sealed it up. I use plain Elmer's white glue to hold my canopies on simply because it dries clear and unlike CA superglue, it has no fumes that cause the canopy fog.
After that, it was as simple as putting down my base coat of Tamiya Insignia White and masking off the panels that I wanted to stay white.


A few coats of different greens, a little decal work and flat coat later, everything here is finished. I give you Corran Horn's E-Wing Mk II:


Thanks for looking.  I plan on being very busy for the next few months with a newborn girl, so I'm not sure what my next project will be or even when I will start it. But, when things settle down a bit I will be back. Thanks for looking!

Wednesday, August 22, 2012

E-Wing: Ready for Paint

A bit more progress on the E-Wing Mk II the past few weeks. First up, the new cockpit.  I moved the pilot chair forward and made room for a droid socket behind him. As this will all be sealed up before I put the base coat on the model, I have already painted the interior, pilot and droid.

Decals for interior detail and computer consoles for the droid:

 My E-Wing Pilot, Expanded Universe character Corran Horn. Corran is a Jedi Master in the latest series of Star Wars novels, known for having distinctive green robes. This figure is a repaint of the Obi-Wan Kenobi figure that was included but not used for my 1/72 Fine Molds Falcon kit.

I have also trimmed out the Vac-Form canopy and applied vinyl window masks.

A quick painting of the main guns, they are a darker green than I am going to use for the main hull. I started off painting them white, then cut thin strips of masking tape for the striping and followed with the dark green.

And lastly, a shot of everything put together ready for paint:


Tuesday, August 7, 2012

E-Wing: More Mods.

A little more progress on the E-Wing this week.  I have been trying to tackle the problem of the top cannon. The way the ship is designed the third cannon on the top of the ship goes over the canopy and sits right on top of the pilot. I figure that this would cause a number of problems from getting the pilot into the cockpit to blinding him every time he fired it. I spent the week trying a few different fixes for this.


 The first idea that I had was to simply shorten the barrel. I cut of the resin barrel and replaced with styrene the same as the main guns. Not bad, but still just lacking something.

Taking a design cue from my E-Wing scratch project, I thought I would try my hand at building a two barrel turret. What I like about this idea is that it preserves the "third cannon" look which is unique to the E-Wing but gives it a more functional role. With a turret, you get a cannon that is out of the pilots view and a 360 degree range of fire, allowing you to shoot at any enemy fighter trying to take you out from behind. 

Here is the first attempt. After looking at it for a day, I decided that it was simply too big.


This is the second turret that I built. The cannons are much smaller and look more in scale to the rest of the ship. I'm really liking this one. I still need to thin the mount down, just to keep a sleeker profile and add a little photo etch for detail.


All I have left construction wise is to rebuild the cockpit. The kit comes with a chair, but it places the pilot a good ways back from the controls. Since there is so much room in the cockpit, I'm going to move the chair forward and then build a droid socket behind the pilot. The E-Wings didn't have external droids, but to me it just isn't a Star Wars fighter without an R2 unit somewhere.

Wednesday, August 1, 2012

The E-Wing.... again

Yeah, I know this will only be the fourth E-Wing variant that I have done. What can I say, for some reason I really love this ship, and people keep making them.

The only E-Wing that has ever been seen is known as the Mk I. It was created for the Dark Horse comics "Dark Empire" story line. The idea was to introduce a new fighter that would take the place of the aging X-Wing,  after all it is not like the military still uses the F-14 Tomcat just because we thought it was cool in Top Gun. But we fanboys refused to accept it, so even though current Star Wars novels are some 20 years after the events of Return of the Jedi, the X-Wing is still king of the fighters.

My E-Wing Mk I

Then I found this image online... and I was in love all over again. It took the idea of the E-Wing and made it sleek and mean.
So I tried to make a model just like it. And I failed... epically. I didn't have the skills for the task. I started with a X-Wing body and for the first time cut and added styrene parts to try and reshape it. Not bad for a first attempt and I learned a lot, but I have never been happy with it.

My next E-Wing was a complete scratch build. I started from my own set of blue prints and build the whole thing.  I entered it in to a contest at Starshipmodeler.com and did quite well for my first time. I choose the E-Wing because it didn't have a lot of curves, making it ideal for a first scratch project.
I was moving on from this ship when a new kit was released. It was "grown" on a 3D printer from the CGI files of the "Fate of the Galaxy" design I loved so much. I just couldn't stop myself. So here it is...again, the E-Wing.

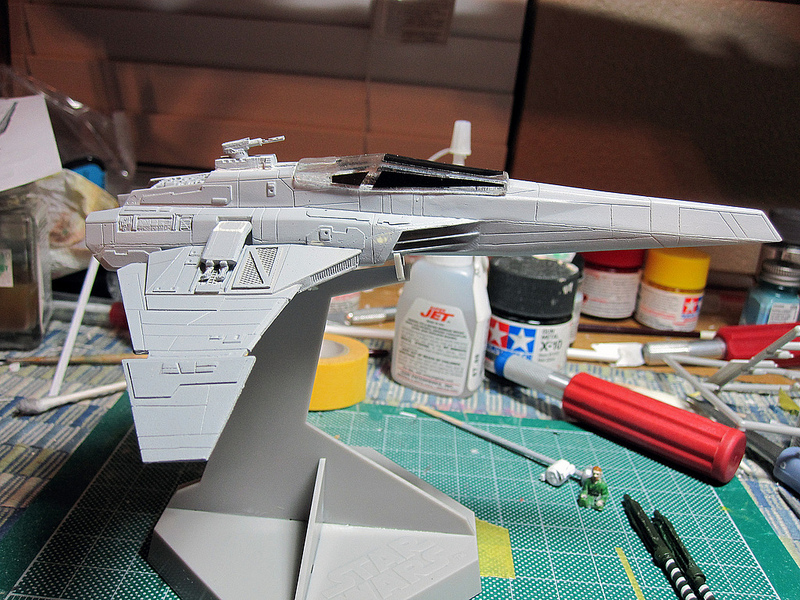
This is the .jpg models 1/72 scale E-Wing Mk II, mastered by nicholassagan. This kit comes with decals, vac-form canopy and pilot.

 This is the only pour stub on my cast. Even the mould seems are placed along leading edges to make them easy to clean. The casting on this kit is simply amazing.
 To remove any residual mold release agent on the model, I always wash resin kits with warm water and dawn dish soap. This keeps the paint from peeling off later when masking.
 Then guns... yeah, resin parts will warp in the heat. Plus these were cast a little to thick for my tastes, so I replaced the gun barrels with some spare styrene tubes.
 They are sample loops I pulled from an expired box of test cartridges that I had to through out at work. I cut off the tip, and drilled the barrels out with my pin-vise. 

 Much better.
 The only other problem area was the thruster bells on the engines. The detail just wasn't as crisp as I would like it to be.
 I dremeled off the kit resin and then replaced them with plastic bells from the 1/72 Fine Molds X-Wing kit extras I had laying about.
I'm not going to build this kit straight out of the box, so over the next week I hope to finish a few more little modifications.