Finally finished with the last part of my commission build. I had a blast with these, and am more than a little sad that I have to get them in the mail Monday. Here are the finished pics of both the Carrack class cruiser, and the Imperial Escort Carrier, each with matching scale TIE fighters. Enjoy!


Saturday, June 14, 2014
Saturday, May 31, 2014
Carrack\Carrier WIP
Some more work in progress pics of the 1/4222 scale Carrack Cruiser and Imperial Carrier. Most of the painting is done, as well as the decal work. I still need to weather both with a good wash and some detail work. For the Carrier, I built a small interior for the hangar. This model isn't going to be lit, and the two tiny TIEs will block most of the view anyway, but my OCD said it needed to be there.
Now these I am really proud of. I am making 1/4222 scale TIE fighters from scratch for this project. The size of these things is insane, the wings measure 1 mm wide by 2 mm tall. I ran in to a problem with how to detail the wings at this scale, but fortunately I was able to get some help. JBOT decals was kind enough to create and supply me with a few sheets of decals to get the solar panels on the wings. I am really happy with how these little guys are turning out. Here are some extreme close up pics of the decal sheet and a completed wing.
Almost done with the project, and then sadly I will have to ship these with the rest of my commission order.
Friday, April 18, 2014
Carrack and Imperial Escort Carrier
Working on two new commission projects, the Carrack class cruiser and the Imperial Escort Carrier. These are both resin cast kits from Utar Ships and in 1/4222 scale.
Up first, the Carrier. The level of detail on both this and Carrack are impressive. This is a hollow cast kit just begging for some extra attention, and has plenty of room for lighting if you want to.
The engine bells are solid cast, but nothing a little work with the dremel can't fix
The main hanger bay is also solid cast. You have the option of painting it black, drilling it open, or you can detail it with some styrene to simulate a closed bay door.
Going for the open look. I drilled out the resin plug and am in the process of adding a small interior and a rig to hang some TIEs in flight coming out of the bay. Not much of a carrier if it isn't carrying anything.
The other kit that I have in progress is the Carrack class crusier. Not much to this kit, but again detail is impressive and the fit is perfect.
The Carrack has a small rack on the bottom that allow this ship to carry a TIE fighter. I have scratched one in 4222 scale, which is to say it is tiny. In total I will be making three little TIEs for this project. They measure 1mm in length by 2mm tall. It's pretty simple construction, a 1/700 gun barrel for the cockpit, with two thin styrene panels glued on. Not much room for detail, but at this scale you wouldn't be able to see it anyway.
Sunday, March 30, 2014
Finished: Acclamator and Dreadnaught
Finally put the decals and final weather touches on the commissioned Acclamator and Dreadnaught. I'm really happy with the way these turned out, and more than a little sad that I have to put them in the mail instead of on my shelf!
First up, the Acclamator class Star Destroyer. I kept the paint job close to the model seen in "Attack of the Clones", and added the requested Imperial Cogs.
I was much more free with the paint job on the Dreadnaught,as it has never been featured on screen.
A quick compassion to Acclamator I made a few years back.
A shot of my 1/4222 fleet to get a sense of the scale of these ships.
Next up on the bench, another commission job. I'll be working up more 1/4222 scale goodness, the Imperial Carrier and a Carrack Class cruiser.
Friday, January 3, 2014
First Commission Job
I've put work on my build of Serenity on hold for a while. I recently started work on my first commission job. I've always just built for myself, so it's an interesting challenge. My client is building a fleet of 1/4222 scale ships, and has sent me two subjects in that scale to work on. The first is the Star Wars Action Fleet Acclamator. I have already converted this toy for my own collection, but this time I'm really going to go all out on the detailing.
This toy is very reasonably detailed for a toy and just happens to be in the right scale, but it needs a little help. It has massive landing gear that hangs on the bottom, and the back two don't retract. Step one, remove them with the Dremel and cover with styrene.
New Styrene covers:
I also needed to cut off the front screw hold, and cover up the front landing gear as well:
I added two small guns to the bottom to cover up the holes for the plastic ties the help the toy to the packaging, I also sanded off the "made in China" and LFL copyright writing.
I am adding small styrene strip over the armor panels on the top to add some detail, this is a slow task and a pain, but it looks great in the end.
Detailed up the troop doors:
A before and after shot of the side trenches, adding lots of detail here as well:
More plastic bits! I'm also going to add more wire and detail to the engines.
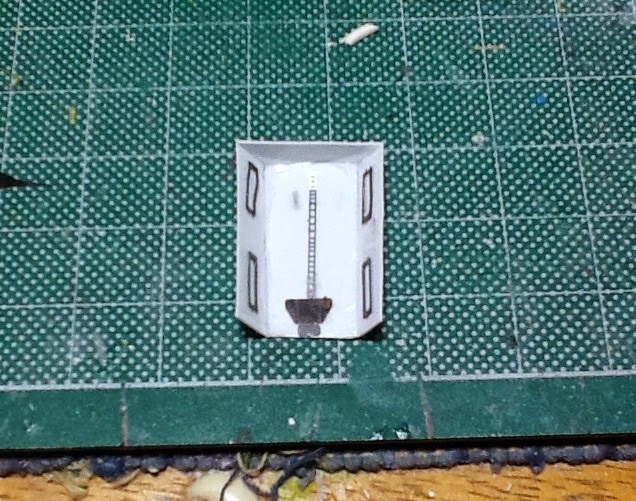
The second kit I'm working on is the 1/4222 .jpg Drednaught. It's a small but great little kit. I didn't like the detail on the radar dishes, so I made my own.
This kit is hollow cast, which is very nice if you add lights to your kits.
A comparison of the kit radar dishes and my new ones.
Finished build the Dreadnaught really quick, just need to get some paint on it now!
I still have a good bit of work to go, but this is shaping up to be a fun project. More to come!
Subscribe to:
Posts (Atom)